

Adding checkpoint firewall in eve-ng is very simple, Eve-ng has provided one of the best platform for unlimited testing and practice for examination. To add checkpoint firewall in Eve-ng, we need Checkpoint firewall OVF image.
I have provided the download link for checkpoint firewall below and explained in detail to add checkpoint firewall in eve-ng. We need to upload the ovf image in Eve-ng and then we have to convert it hda.qcow2 and move it to correct folder.
There are two ways that you can use to add checkpoint firewall in eve-ng.
1. Download the ISO image and install the Checkpoint firewall on VMware and then export it to OVF. After exporting the OVF image you have to upload to Eve-ng and then convert it to hda.qcow2.
To download the Checkpoint firewall ISO image use below link.
(i) From Checkpoint website – Download
Preffered OPTION Create image from ISO
1. From EVE CLI, create Checkpoint image folder and go to that location:
mkdir /opt/unetlab/addons/qemu/cpsg-R80-10
cd /opt/unetlab/addons/qemu/cpsg-R80-10
2. Upload the downloaded Check_Point_R80.10_T462_Gaia.iso image to the EVE /opt/unetlab/addons/qemu/cpsg-R80-10 folder using for example FileZilla or WinSCP.
3. Rename original ISO image to cdrom.iso:
mv Check_Point_R80.10_T462_Gaia.iso cdrom.iso
4. Create HDD drive for new Checkpoint image:
/opt/qemu/bin/qemu-img create -f qcow2 hda.qcow2 80G
5. Create new lab add your newly created Checkpoint image, connect it to Cloud0 network.
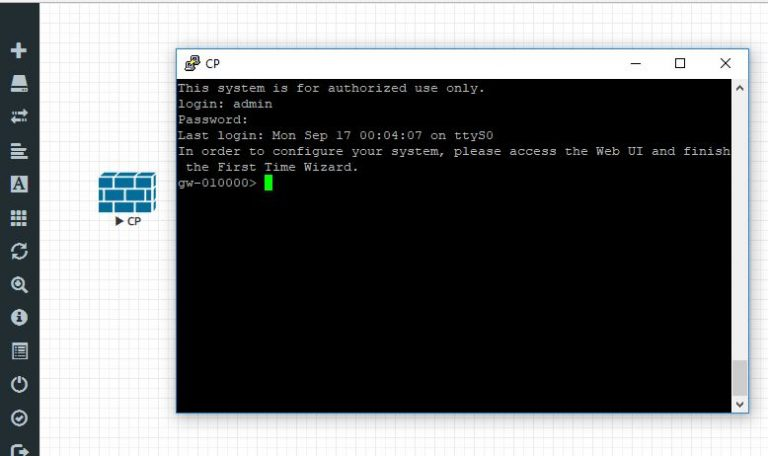
NOTE: When you are adding node on topology, please set the VNC console for your new image. VNC console is required to complete installation from ISO. Later you will be able to use telnet console to the node.
6. Follow install steps on console and complete Checkpoint installation, shutdown Checkpoint image.
IMPORTANT: Commit the installation to set it as the default image for further use in EVE-NG:
7. On the left side-bar within the lab in the EVE Web-UI choose “Lab Details” to get your lab’s UUID details: In this example: UUID: 3491e0a7-25f8-46e1-b697-ccb4fc4088a28. Find out the POD ID of your used and the Node ID of your newly installed node.The POD number is assigned to your username, and can be found in the EVE GUI, Management/User Management. The Admin user uses POD number 0 by default.

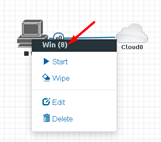
The Node ID can be obtained by right clicking the node on the topology. In this Example it is 8

9. From the EVE CLI, locate the installed image and commit your changes to be used as default for further use in EVE-NG:
cd /opt/unetlab/tmp/0/3491e0a7-25f8-46e1-b697-ccb4fc4088a2/8/
/opt/qemu/bin/qemu-img commit hda.qcow2
10. Remove cdrom.iso from /opt/unetlab/addons/qemu/cpsg-R80-10/
cd /opt/unetlab/addons/qemu/cpsg-R80-10/
rm -f cdrom.iso
Option create image from VMDK.
1. From EVE CLI, create temporary folder:
mkdir abc
cd abc
2. Upload the downloaded image to the EVE root/abc folder using for example FileZilla or WinSCP.
3. Uncompress raw image to get vmdk file:
tar xf Check_Point_R80.10_T421_OVF_Template_Gaia.gz
4. Create target image folder:
Image folder names and hdd names is taken accordingly our qemu image naming table.http://www.eve-ng.net/index.php/documentation/images-table
mkdir /opt/unetlab/addons/qemu/cpsg-R80-10
5. Convert vmdk raw file to hda.qcow2
/opt/qemu/bin/qemu-img convert -f vmdk -O qcow2 Check_Point_SG_R80.10_VE-disk1.vmdk hda.qcow2
6. Copy converted image HDD to target folder:
mv hda.qcow2 /opt/unetlab/addons/qemu/cpsg-R80-10/hda.qcow2
7. Delete temporary folder:
cd ..
rm -rf abc
8. Fix permissions:
/opt/unetlab/wrappers/unl_wrapper -a fixpermissions
Original CheckPoint image default login on cli and WEB is admin/admin
9. Open the Eve-ng and Select the checkpoint firewall and start the node enjoy-
Second method is to simple download a pre built .qcow2 file and import it in the /opt/unetlab/addons/qemu folder of Eve-ng file system. The same procedure is explained in the youtube video below:

I do not even know how I ended up here, but I thought this
post was good. I don’t know who you are but definitely you’re
going to a famous blogger if you are not already 😉 Cheers!
First off I want to say fantastic blog! I had a quick
question which I’d like to ask if you don’t mind.
I was curious to find out how you center yourself and
clear your mind before writing. I’ve had a hard time clearing my
thoughts in getting my ideas out. I do enjoy writing but it just seems
like the first 10 to 15 minutes are wasted simply just trying to figure out how to begin. Any
recommendations or hints? Thank you!
Thanks for another informative website. The place else may I am getting that type
of information written in such a perfect manner?
I have a mission that I’m just now working on, and I have been on the look out
for such info.
Simply want to say your article is as astonishing.
The clarity in your post is just cool and i can assume you’re
an expert on this subject. Well with your permission let me to grab your RSS feed to keep up
to date with forthcoming post. Thanks a million and please carry on the rewarding work.
Great goods from you, man. I have understand your stuff previous to and you’re just too fantastic.
I really like what you’ve acquired here, really like
what you are stating and the way in which you say it.
You make it entertaining and you still take care of to keep it sensible.
I cant wait to read far more from you. This is
actually a wonderful site.
Good way of explaining, and good article to take information about my presentation subject, which i am going to
convey in academy.